Saturday, September 5, 2009

A tutorial!

Hey everyone!
I know I've been MIA, but I promise, I've had lots of great projects happening. I'll post photos here soon ;)
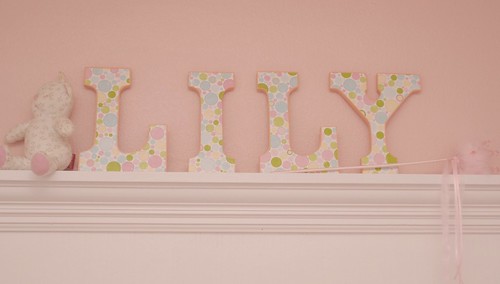
In the meantime, check out this teaser (part of Lily's new bedroom!)

MAT_7989
A tutorial on how to make decorative letters for a nursery. Very easy, 5 steps I think? A less than 1 hour project :)
http://www.ehow.com/how_5384078_make-decorative-letters-childs-roomnursery.html

Wednesday, August 19, 2009

more on eHow!

I now have 10 articles on eHow, including a few of the Tutorials right off this site.
Check them out, rate them, and leave comments if you like! Thank so much!


Thursday, July 23, 2009

A giveaway!

Okay folks! I've got a few of these coming up
Vendors that have donated things to me to help with my fundraising for the Susan G Komen 3 Day in November. I so far have $499.00 fund raised, and I need $2,300 by November 9th, so heres the first fundraiser!

Up for grabs I have TWO Weather teddy bears by Storytime Felts.
I don't know if there are storytime felts reps here in the DFW area, but there are in Northern California where I lived before, and they got us HOOKED. All the kids who come over to our house love our Felt playsets, and they are so easy to use. Not messy, babies can even use them, they are 100% safe, non toxic, no fears of lead, etc... and they are even safe to use in the pool/tub!!

http://www.funfelt.com/weather-teddy-bears.html


These run $33 EACH if you purchase from their website.
These are the mounted board sets (great for kids to need something sturdy to hang on to) and uncut (you cut out the clothes yourself, takes about 5-10 mintes, one time). GREAT for teaching about dressing yourself, clothing, seasons, sensations and more!
[quote]These oversized bears are great fun for little hands to dress up for whatever the weather may be. Sets includes 18 pieces of clothing and 3 felt windows depicting rain, snow, and wind, to go along with the background scene of a sunny day. Girl bear also includes a starry night time window. Choose Boy or Girl bear. Save by purchasing both! See below.
Backgrounds measure either LG 14" x 16" or SM 10" x 12" and can be mounted like a felt board or left unmounted to tack on the wall or make into a pillow or play mat. Set includes 18 felt pieces of clothing to dress your bear in. [/quote]Enter to win by visiting my 3Day Website and donating $5.
Each $5 donation = 1 entry! Donate $15 in one payment, and that's 3 entries
MY 3 DAY WEBSITE: www.tinyurl.com/3dayjr

Donations will be taken through August 4th, and then two winners will be selected from the list of entries using random.org!

eHow, here i come ;)

Today I posted my first tutorial on eHow!
CREATE INEXPENSIVE COASTERS on eHow

Please take a moment to rate my tutorial, and be sure to add me as a friend or subscribe on eHow!
FABRIC FLOOZIES PROFILE on eHow


Tuesday, July 21, 2009

2 new projects!

So it's that time! Time for 2 LARGER Projects. That's right, I'm talking about things bigger and more involved than scrappy coasters ;)
We are making shelving for next to our fireplace, and a kitchen island. WHEW!
I'm tired already.
First is the shelving..

We bought the wood last night to build our first ladder shelving for the living room. Really excited to see how it turns out tonight.

And this weekend we spotted a "FREE OR SALVATION ARMY!" sign on our street and snagged what WAS the bottom of a hutch, which we will be re purposing into a kitchen island. Frustrating part is, we had the idea, I explained it all to JR so that he wouldn't think I was nuts, then he thought I was brilliant... then last night, I picked up a new DIY type magazine, and saw they had the exact same idea in the mag *banghead* so much for being original. LOL
Our soon-to-be island
GEDC0131

I'll be sure to post pics of the shelving as it gets done!


Tuesday, July 14, 2009

The Dining Room + Antique Store Finds

So as you know I've been working on our Dining Room on the cheap. I'm finally making some headway on it, in between finishing Brendan's bedroom.
The color scheme for the Dining Room is black, white, and citrus green.

This wall may just be my favorite thing about the room. Check it out:
MAT_4707

Black Shelf on bottom: $15 bought NIP from a friend.
Black Shelf on top: Came in house - FREE!
Green Mirror: $1 unfinished from Michaels. Used Safari Green Paint by Glidden (sampler $2.98)
2 Glass/Green Candles: $1 bin at Michaels.
White Vase: $4.99 at Michaels. Clearanced.
Flowers: 3 at Michaels
2 White Frames on bottom shelf: $1 each unfinished from Michaels. Used some White paint I had lying around.
Pictures in bottom frames: Printed on home PC. FREE
White frame on top shelf: $1 unfinished from Michaels.
Paper in Frame: Scrap of Scrapping paper used for Dining Room Coasters.
White Metal Basket: $2 CCA Thrift Store, painted White.
Yarn: From my stash - a perfect color match!

That's a pretty cheap display right there! It's obviously not done (still a bit empty) but I love it anyways :)

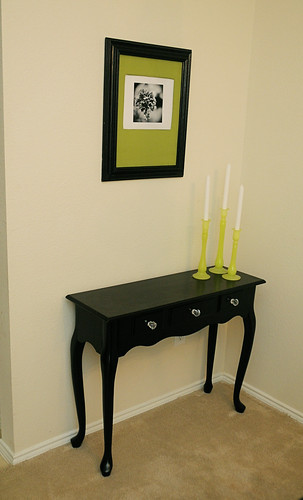
You might remember that when I redid the table/chairs/side table, I also painted 2 large wood frames black. They were given to me by my dad and had no hardware or glass, which meant that until I could get some glass cut, I'd need a sturdy/firm mat to hold it all together.
Not only could I not find ANY mat for the 14x18 frame (what an odd size!), I also couldn't find any PRETTY matting for either of them, or artwork I'd want hanging in my dining room.
So, we did it a creative way. I spent $7.99 on a set of green pillow cases and sent JR outside with his jig saw and some luan. He cut me mats to the sizes I requests and using a staple gun, I covered them with the fabric from the pillowcases.
Then I printed photos I liked from flickr (check out their creative commons pics if you need something quick!) and printed them on my home pc.
MAT_4706
MAT_4699

And don't you love those candle holders? Yeah, they were a gift. I hit up Golightly's in NRH the other day with my mom, and she got me those candle holders, AND this beautiful white antique wash basin. Love it.
MAT_4710

Monday, July 13, 2009

scrappy panties

Lily is about to start PTing here in the next few months and my husband is way over having scraps of fabric strewn about my office/sewing room - aka. master bedroom LOL.
So I took the scraps from this weeks PJ's and made her a pair of Panties. and OMG, are they cute.
Using the pattern by That.Darn.Kat. slightly modified (there shouldn't be a seam down the back) due to not having any really large scraps of fabric.

MAT_4712

MAT_4713